How to work with images using damfn
This page explains how to work with images and other assets stored in
Magnolia Digital asset
management using
damfn
templating
functions in template scripts.
Imaging modules
If you use a Magnolia bundle, the required and optional modules are already included.
If you created a custom webapp, add the following modules in the POM file of the webapp of your bundle. The modules may have dependencies to other modules, but these dependencies are handled by Maven dependency management.
Selecting image in dialog using link field
To select an image in a dialog, use a link field. It stores a reference to the selected asset.
Example: Code fragment from a dialog definition.
form:
  properties:
    image:
      $type: damLinkField
Displaying an image
To render an image, you need to get a link to the asset. Use the link as
a value in the src attribute of the img element.
Getting an image link with itemKey
Use the #getAssetLink(itemKey) method if you have the
itemKey
of the image. See Get
link for asset. For instance, the textImage component stores
itemKey in the image property. This is a very common use case.
Example: Getting an image link with itemKey. Assume that this code
is executed in a component template. The current content node has a
property named image where itemKey is stored.
[#assign imgItemKey = content.image!]
[#if imgItemKey??]
    [#assign imgRef = damfn.getAssetLink(imgItemKey)!]
    [#if imgRef??]
        <img src="${imgRef}"/>
    [/#if]
[/#if]
Getting an image link for an asset
Use the getLink() method if you already have the asset. Since an
[.inlineBean]#info.magnolia.dam.api.Asset object is a Java bean, you can
use its public method #getLink(). You may even use the dot notation.
Example: Getting an image link for an asset.
[#assign myAsset = damfn.getAsset("jcr","/photos/pool.jpg")!]
[#if myAsset??]
    <img src="${myAsset.getLink()}"/>
[/#if]

[#assign myAsset = damfn.getAsset("jcr","/photos/dilbert.jpg")!]
[#if myAsset??]
    <img src="${myAsset.link}"/>
[/#if]
Displaying resized images
|
If you need different sizes of the same image, do not upload multiple copies (variations) of the same image to your DAM repository. Instead, upload the image only once and define image size variations in your theme. |
Defining image variations
Configure your image variations in a theme. Each variation should be a
node under <my-theme>/imaging/variations. The variation node name is
what you will be referencing in your template
scripts. It is also known as rendition name.
Example: Defining three image variations in a theme.
Configuring theme variations
| Property | Description |
|---|---|
|
optional Imaging node of the theme. |
|
required info.magnolia.templating.imaging.VariationAwareImagingSupport provides support for image variations. |
|
required Map of image variations. |
|
required Name of the variation (rendition). Choose a name that describes the variation. The name is used in template scripts to reference the variation. Add one node for every variation. |
|
required You can use one of the available classes or create a custom one. The available properties depend on the class used for the variation. Any custom class must implement info.magnolia.imaging.variation.Variation. The MTE module provides:
|
|
Add properties that are supported by the class used. |
|
optional Enables and disables support for image variations. |
On the node /modules/site/config/themes/<your-theme>/imaging, you must
specify the class property. The used class must implement info.magnolia.imaging.ImagingSupport.
The MTE module provides
info.magnolia.templating.imaging.VariationAwareImagingSupport,
which is a good choice for our use case here.
Add one node for every required variation below
<your-theme>/imaging/variations. The name of such a node is the name
of the variation (rendition name). In the example above,
we have defined the renditions small-square, thumbnail and medium.
For every variation, you have to configure some properties. The available properties depend on the class you use in the variation. You can implement your own class. The definition class must implement the info.magnolia.imaging.variation.Variation interface.
In the example above, we use
info.magnolia.templating.imaging.variation.SimpleResizeVariation.
This class is provided by the magnolia-templating-essentials-imaging
module. Your webapp bundle must contain the module.
Properties of SimpleResizeVariation:
| Property | Description |
|---|---|
|
|
|
required Class used to resize images to a defined size in pixels. Must implement info.magnolia.templating.imaging.variation.SimpleResizeVariation. |
|
optional, default is Defines whether the image can be cropped to fit the desired aspect ratio. Example: A source image in the DAM is 800x800 px (square). For a
variation, you define the desired target size as 200x100 (rectangle).
The image is first resized to 200x200 and then cropped equally
from the top and bottom to reach 200x100 so that it is not
distorted. If you set |
|
optional, default is Defines whether the image can be expanded when it is not cropped. |
|
optional Integer to define the height in pixels. You must define either |
|
optional Integer to define the width in pixels. You must define either
|
|
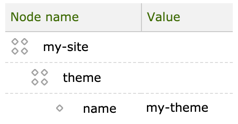
Make sure the site where you want to display the image variations references
the theme. In the Site app,
the
|
Getting an image variation
Example: Getting an image variation (asset rendition) with itemKey.
Assume that content in this example stores itemKey in the image
property.
[#assign imgItemKey = content.image!]
[#if imgItemKey??]
    [#assign myMediumRendition = damfn.getRendition(imgItemKey, "medium")!]
    [#if myMediumRendition??]
        <img src="${myMediumRendition.getLink()}"/>
    [/#if]
[/#if]
Example: Getting an image variation (asset rendition) for an asset.
[#if myAsset?? && myAsset.isAsset()]
    [#assign myThumbnail = damfn.getRendition(myAsset, "thumbnail")!]
    [#if myThumbnail??]
        <img src="${myThumbnail.getLink()}"/>
    [/#if]
[/#if]
Image variation cache
Magnolia caches image resources to improve performance. Any dynamic
images generated by the Imaging module are also cached at two levels: in
the imaging workspace and in the actual cache like any other page or
document. This means that once the system generates an image, you keep
getting the same cached image on subsequent requests.
Disabling image cache during development
During development, it is helpful to disable caching of generated images
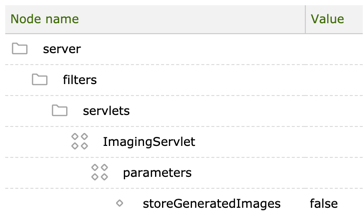
completely. Go to Configuration > /server/filters/servlets/ImagingServlet/parameters, create a new
property named storeGeneratedImages and set its value to false.

|
Remove the property or to set it to |
Deleting image variations in the imaging workspace
Once image variations are stored in the imaging workspace, they
remain there. After you remove the storeGeneratedImages property, any
cached image variations are served from the imaging workspace again.
Delete the nodes from the workspace.
Option 1: Groovy script. In the script, examples-theme is the name of
your theme. You can run this script in the
Groovy console or add a new
script and run it.
session = MgnlContext.getJCRSession('imaging')
images = session.getNode('/examples-theme')
images.remove()
session.save()
Option 2: Delete the nodes in the imaging workspace in the
JCR Browser app.
