Google Analytics 4
Magnolia provides you with a user-friendly interface to create dashboards and add widgets in the Analytics app. The Analytics app is configured through the Analytics module which is then connected to the data supplier. If your data supplier is Google Analytics, it is important to point out that Google has released GA4 (Google Analytics 4) to replace the current UA. The major difference between the two is that GA4 allows you to track analytics on websites and applications, while UA was limited to website tracking.
To continue collecting data for analysis and website traffic tracking, it is important to migrate to GA4, and it is highly recommended by Google to do it manually as not all UA configurations have an obvious GA4 counterpart. If you don’t migrate manually, a new GA4 property will be created for you automatically. Read more about it over here.
To check if your property type has been updated to GA4 or if you’re still on Universal Analytics, click the down arrow in the top left corner next to the Analytics logo. Universal Analytics property IDs start with UA and end with a number (UA-XXXXXXXXX-1), while GA4 property IDs have only numbers (XXXXXXXXX). If your property type hasn’t been upgraded to GA4, keep on reading.
How to move to GA4?
First thing you need to do is create GA4 in your Google Analytics dashboard. You can use GA4 Property Setup Assistant for this.
Configuring GA4
Since GA4 uses a different authentication system (OAuth2) than its predecessor, it’s also necessary to generate Google Analytics data API key for authentication.
-
Go to Quickstart, and click Enable the Google Analytics Data API v1. This will generate a
.jsonfile with client configuration. Save the file ascredentials.json.It is very important to download and store this private key file correctly as we will need it to authenticate Magnolia with Google. In this file you will also notice an email that’s been created - we will use that in step 4 to give this account access to GA4. -
In your organization’s Google Cloud Console, go to APIs and Services.
-
In the Credentials section, we will register the new API key.
-
Go to Property access management and add the
client_emailfrom thecredentials.jsonfile to it.Example:{ "type": "service_account", "project_id": "fakeAnalyticsTestProject-234412", "private_key_id": "randomId", "private_key": "randomKey", "client_email": "abc@email.com", "client_id": "randomId", "auth_uri": "https://accounts.google.com/o/oauth2/auth", "token_uri": "https://oauth2.googleapis.com/token", "auth_provider_x509_cert_url": "https://www.googleapis.com/oauth2/v1/certs", "client_x509_cert_url": "https://www.googleapis.com/robot/v1/metadata/x509/" }
The client email is linking GA4 to collect data.
-
Back in the Analytics dashboard, go to Account Settings and select Property Access Management. Add the
client_emailto the list. Once the email has been added, the API key we generated in step 1 can be used. -
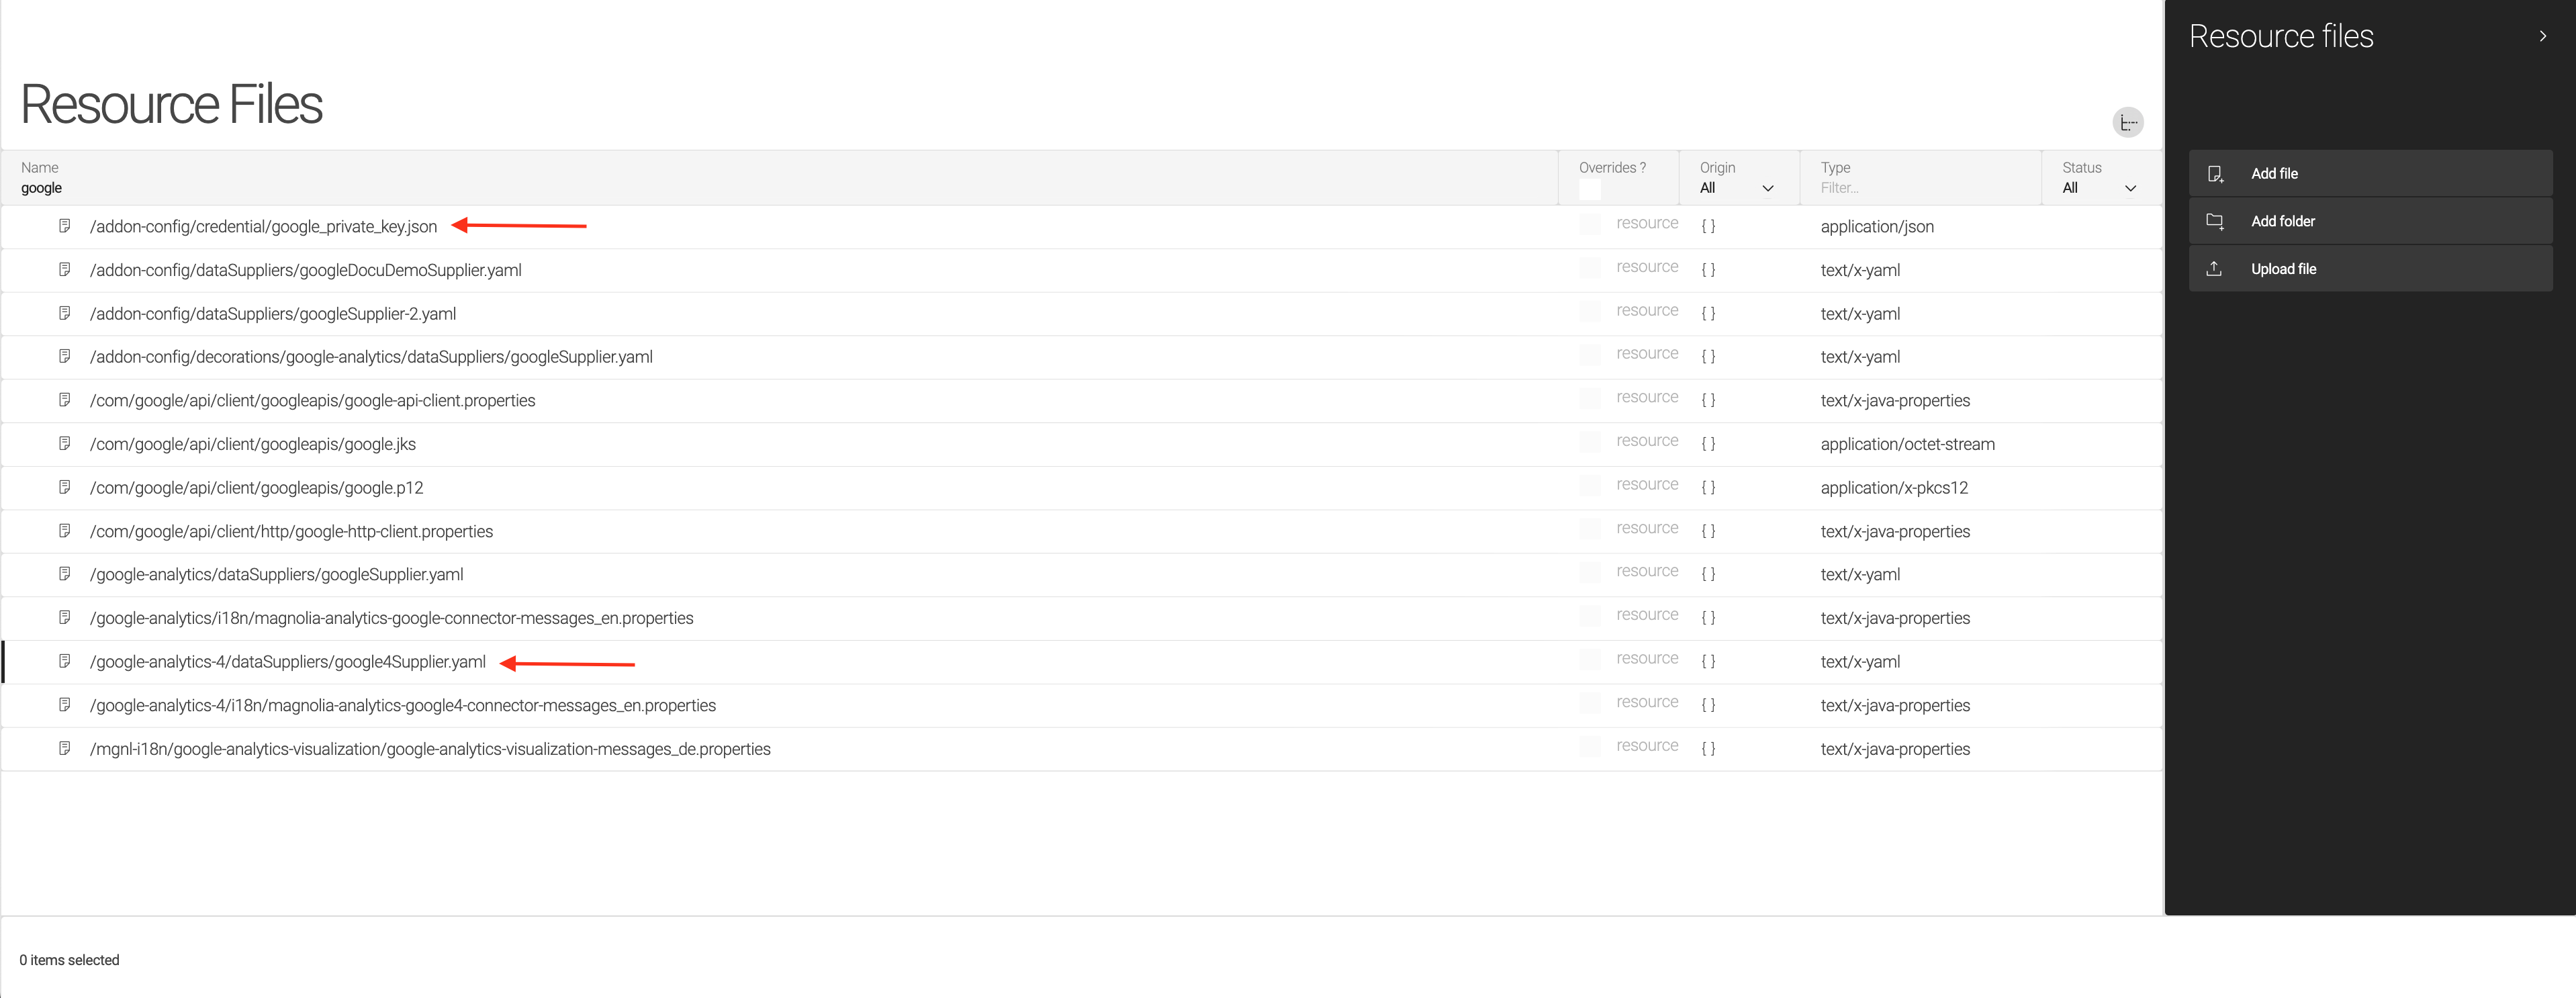
Switch to Magnolia, and go to the Resource Files app. In the action bar, click on Upload file and upload the
credentials.json. Type “Google” in the Name search to make sure the newly generatedjsonfile and the supplieryamlfiles are both there.
-
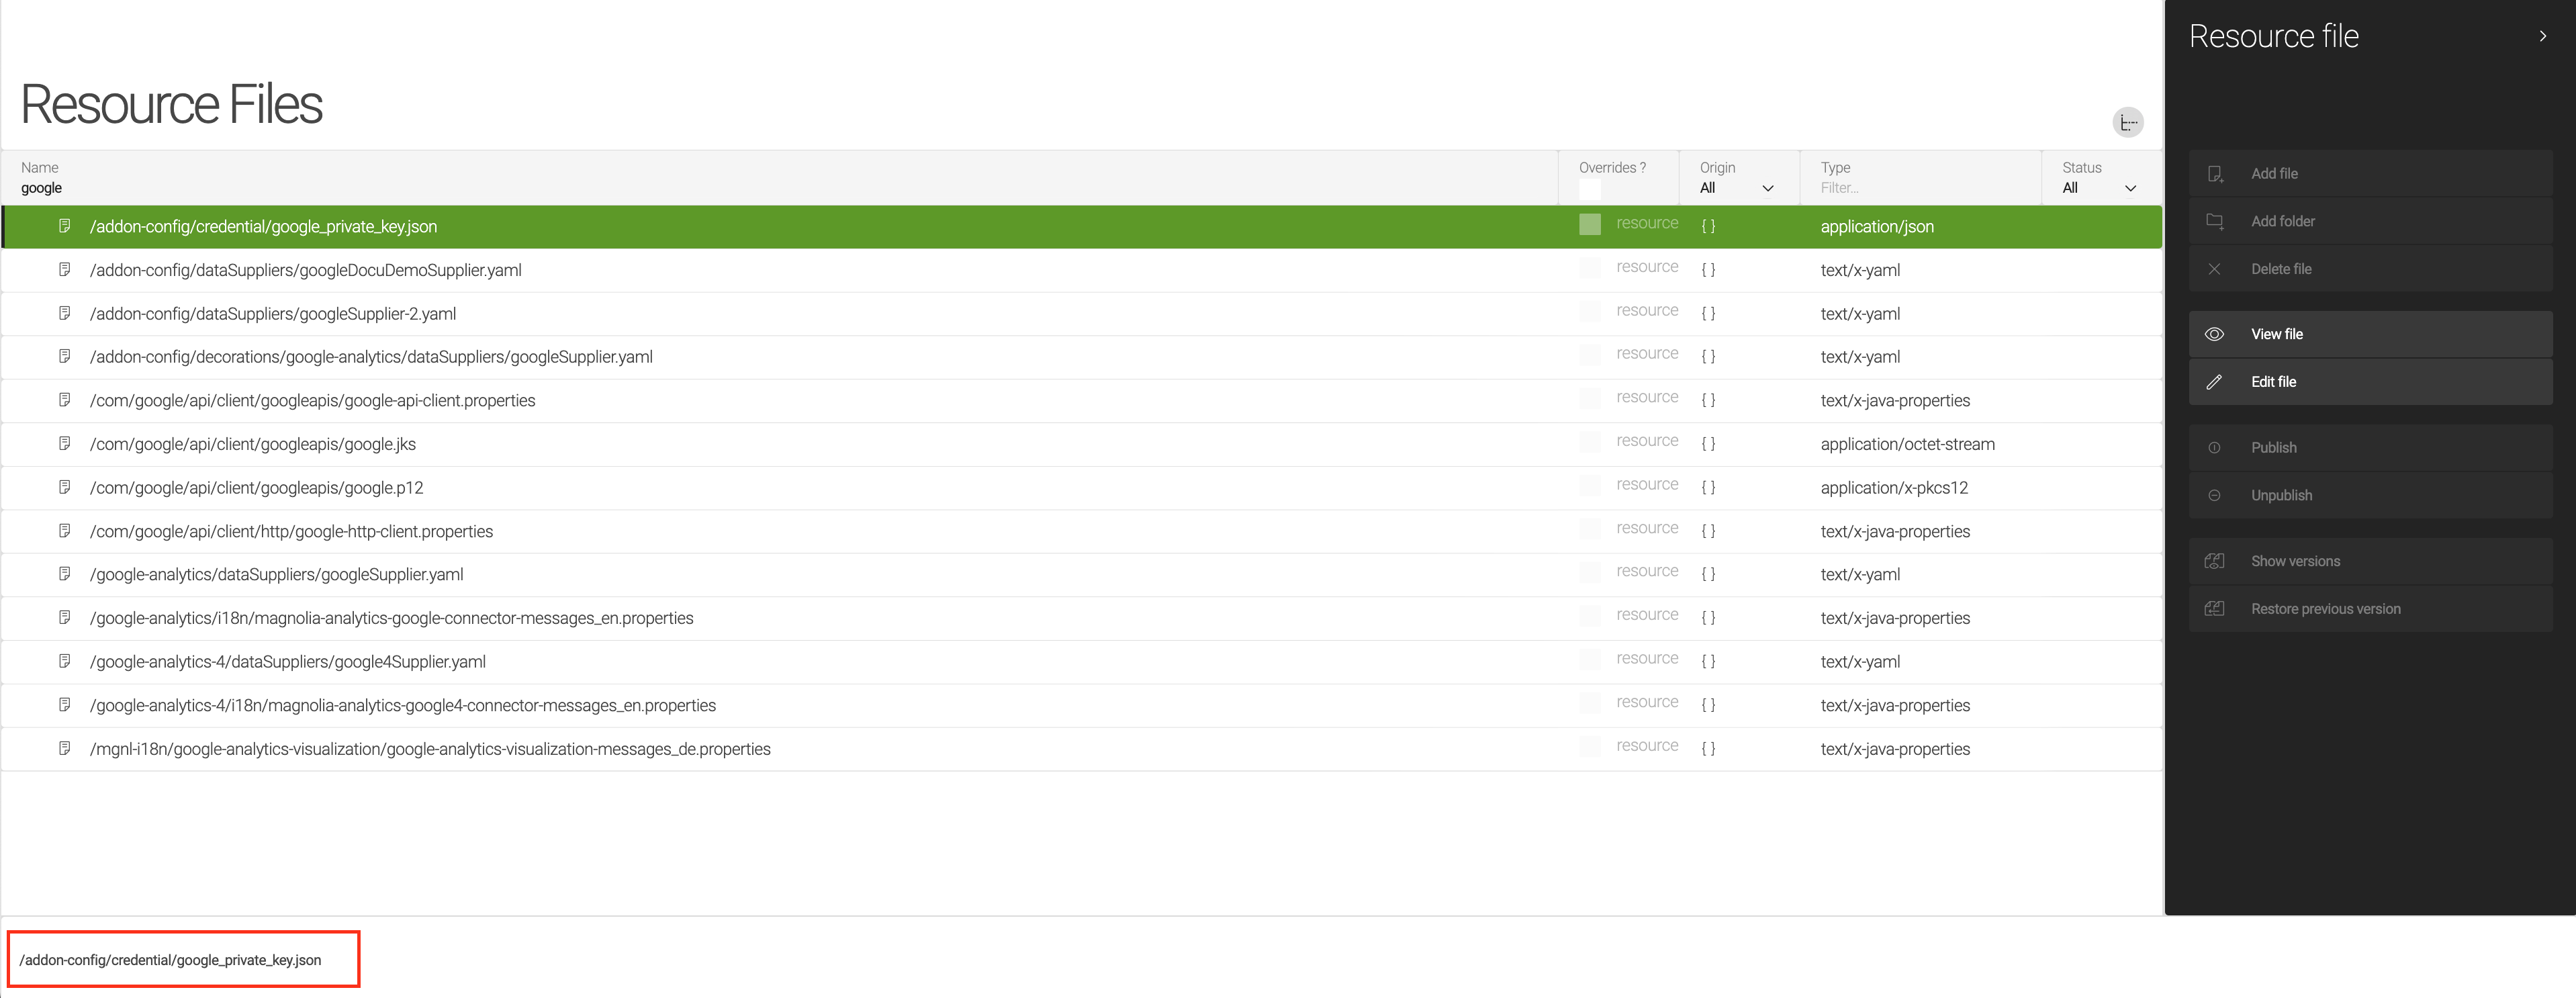
Select the
jsonkey file from the list and copy the path that appears in the bottom-left corner.
-
Now, open the google4supplier file and paste the path under
serviceAccountJsonPath. -
In the same supplier file, modify the
propertyIdwhich can be found in your GA account, and click on Save changes.
Metrics, dimensions and dates
Another thing to pay attention to when configuring GA4 in Magnolia are metrics, dimensions and dates. These can be modified in the same supplier file we’ve worked on in the steps above.

In GA4, metrics and dimensions do not contain the ga prefix as seen in previous versions. Read more about metrics and dimensions over here.
Example of user dimensions
|
The numeric identifier of an Audience. Users are reported in the audiences to which they belonged during the report’s date range. Current user behavior does not affect historical audience membership in reports. |
|
The given name of an Audience. Users are reported in the audiences to which they belonged during the report’s date range. Current user behavior does not affect historical audience membership in reports. |
|
New users have 0 previous sessions, and returning users have 1 or more previous sessions. This dimension returns two values: 'new' or 'returning'. |
|
The string 'yes' if the user signed in with the User-ID feature. To learn more about User-ID, see User-ID for cross-platform analysis. |
Example of user metrics
|
The number of distinct active users on your site or app within a 1 day period. The 1 day period includes the last day in the report’s date range. Note: this is the same as Active Users. |
|
The number of distinct active users on your site or app within a 28 day period. The 28 day period includes the last day in the report’s date range. |
|
The number of distinct active users on your site or app within a 7 day period. The 7 day period includes the last day in the report’s date range. |
|
The number of distinct users who visited your site or app. |
|
The number of distinct users who visited your site or app. |
The way you write the date slightly differs from the previous version (e.g. before with UA = 7DaysAgo, now with GA4= 7daysAgo.) Read more about dates over here.
Example of dates
|
The inclusive start date for the query in the format |
|
The inclusive end date for the query in the format |
|
Assigns a name to this date range. The dimension dateRange is valued to this name in a report response. If set, cannot begin with |
Google site tags
Connected site tags work by an additional gtag(config, G-XXXXX) call (without any parameters), which downloads a Google Analytics 4 tag container and sends an automatic page_view` event to the Google Analytics 4 property.
Read more about connected site tags in Set up Analytics.