Updating CLI to v3
| The behaviour of the CLI can be customized. If you haven’t customized your CLI v2, only the first step is required to update Magnolia CLI to v3. |
Updating CLI using the npm command
To update your Magnolia CLI installation, use the npm update command:
npm update @magnolia/cli -gOn Linux or OS-X, you may need to run this command with superuser rights. The command installs Magnolia CLI globally and overwrites the previous globally-installed configuration files.
Updating a customized local v2 configuration
If you have customized your CLI v2 configuration with the
customize-local-config
command, you have two options to update the configuration to Magnolia
CLI v3:
-
If you do not need the v2 customizations anymore: delete the
mgnl-cli.jsonandmgnl-cli-prototypesdirectory in the location of the customized configuration. -
If you do need the customizations: you must migrate the CLI v2 configuration (
mgnl-cli.jsonand prototype files). This is explained in the steps below.
Migrating the CLI v2 configuration
To migrate your local CLI configuration:
-
Move your existing
mgnl-cli.jsonandmgnl-cli-prototypesdirectory to another backup location. -
Run the
mgnl customize-local-configcommand to place new default versions of those files there. -
Reapply the customizations from the backup location to those new file versions as explained in more detail below.
Migrating mgnl-cli.json
In CLI v3, the contents of mgnl-cli.json have changed.
Compare it with your backup copy of the customized CLI v2
mgnl-cli.json file, and copy the customizations that you want to the
newly created file.
|
Typically, only the webapps and downloadJars nodes are customized.
The following node is no longer used by the CLI:
lightDevFoldersInModule.
Migrating prototype files
We recommend leaving the prototype variants installed with CLI v3 intact
and migrating your original CLI v2 prototypes to a third variant that
has a new name but is based on the _default variant provided in
Magnolia CLI v3. This allows you to choose from three variants provided
by Magnolia (_default, empty, with-js-model) and one migrated from
CLI v2 by you to create a page or component template.
You may use any name for the third variant. In the example below we
chose fromCLI2.
-
In the newly created
mgnl-cli-prototypesdirectory, make a copy of the_defaultvariants for components and pages. -
Rename the newly created variants to
fromCLI2. The 1st and 2nd levels of your v3 prototypes folder then look like this:mgnl-cli-prototypes (folder in CLI v3 with a custom
fromCLI2variant)
├── block
│ ├── _default
│ └── empty
├── component
│ ├── _default
│ ├── empty
│ ├── fromCLI2
│ └── with-js-model
├── light-module
│ ├── comprehensive
│ └── _default
├── page
│ ├── _default
│ ├── empty
│ ├── fromCLI2
│ └── with-js-model
└── virtual-uri
    ├── _default
    ├── empty
└── regexp-
Copy your backup CLI v2 prototype files to the respective subfolders of
fromCLI2. -
Delete the original
yamlandftlfiles in the target folders. -
Rename the migrated files in the target folders to
name.
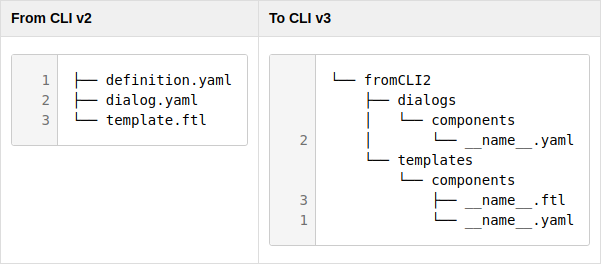
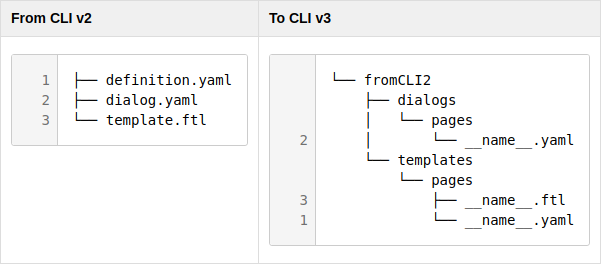
See the following figures and the corresponding line numbers:
Migrating content in the root component subtree

Migrating content in the root page subtree
